AI video models often stop following a prompt when one generation is asked to invent the visual style, character, location, composition, action, and camera movement at the same time. The instructions compete with one another, so important details drift or disappear.
The fix is not one enormous prompt. It is a set of techniques that give the model fewer things to guess.
I spent over $1,000 in Seedance 2.5 credits learning which of those techniques actually work. The video above walks through the three that survived, and this article is its companion: the assets, the exact prompts, and the results from the sessions the video was recorded in, so you can copy the workflow instead of the theory.
The three techniques, with the timestamps in the video:
- Storyboard the shots before you generate so the model follows a visual plan instead of inventing the sequence.
- Lock the look with a master prompt so every image and clip shares one visual language.
- Draw what you cannot describe with sketches and shape guides that control pose, composition, and motion.
Every prompt below has a Use Prompt button that opens it in Yapper. The agent prompts go to Yapper Assistant. The image and video prompts go straight to the generator with the model already selected.
1. Storyboard the Shots Before You Generate
Before I shoot anything, I plan the shots, decide what I am trying to get, and work from that plan. The example in the video is a samurai fighting four ninjas inside a warehouse. Watch this section at 0:40.
Start With the Assets
Storyboards only work when the characters and the location already exist as references. For this scene I had three: a samurai element sheet, a squad of four red ninjas, and an empty warehouse plate.


The samurai and the ninjas came from one request to Yapper Assistant.
The first batch came back looking like game characters, so the second request was the one that mattered. Say what was wrong and what you want instead:
These are the final image prompts the agent wrote for both sheets. Notice how much of each prompt is about the camera, the skin, and the fabric rather than the character.
Image Prompt: Samurai Element Sheet
Image Prompt: Red Ninja Squad
The warehouse started as a photo. I attached it and asked for a people-free wide shot, which gave me a clean plate to reuse in every panel.
Ask for a Nine-Panel Storyboard
With the three references attached, I asked for a 3-by-3 storyboard and listed the shots I already had in mind. Nine panels is the sweet spot. It gives you enough coverage to build a sequence while keeping each frame big enough to read. Sixteen panels squeezed into one image get too small to be useful.
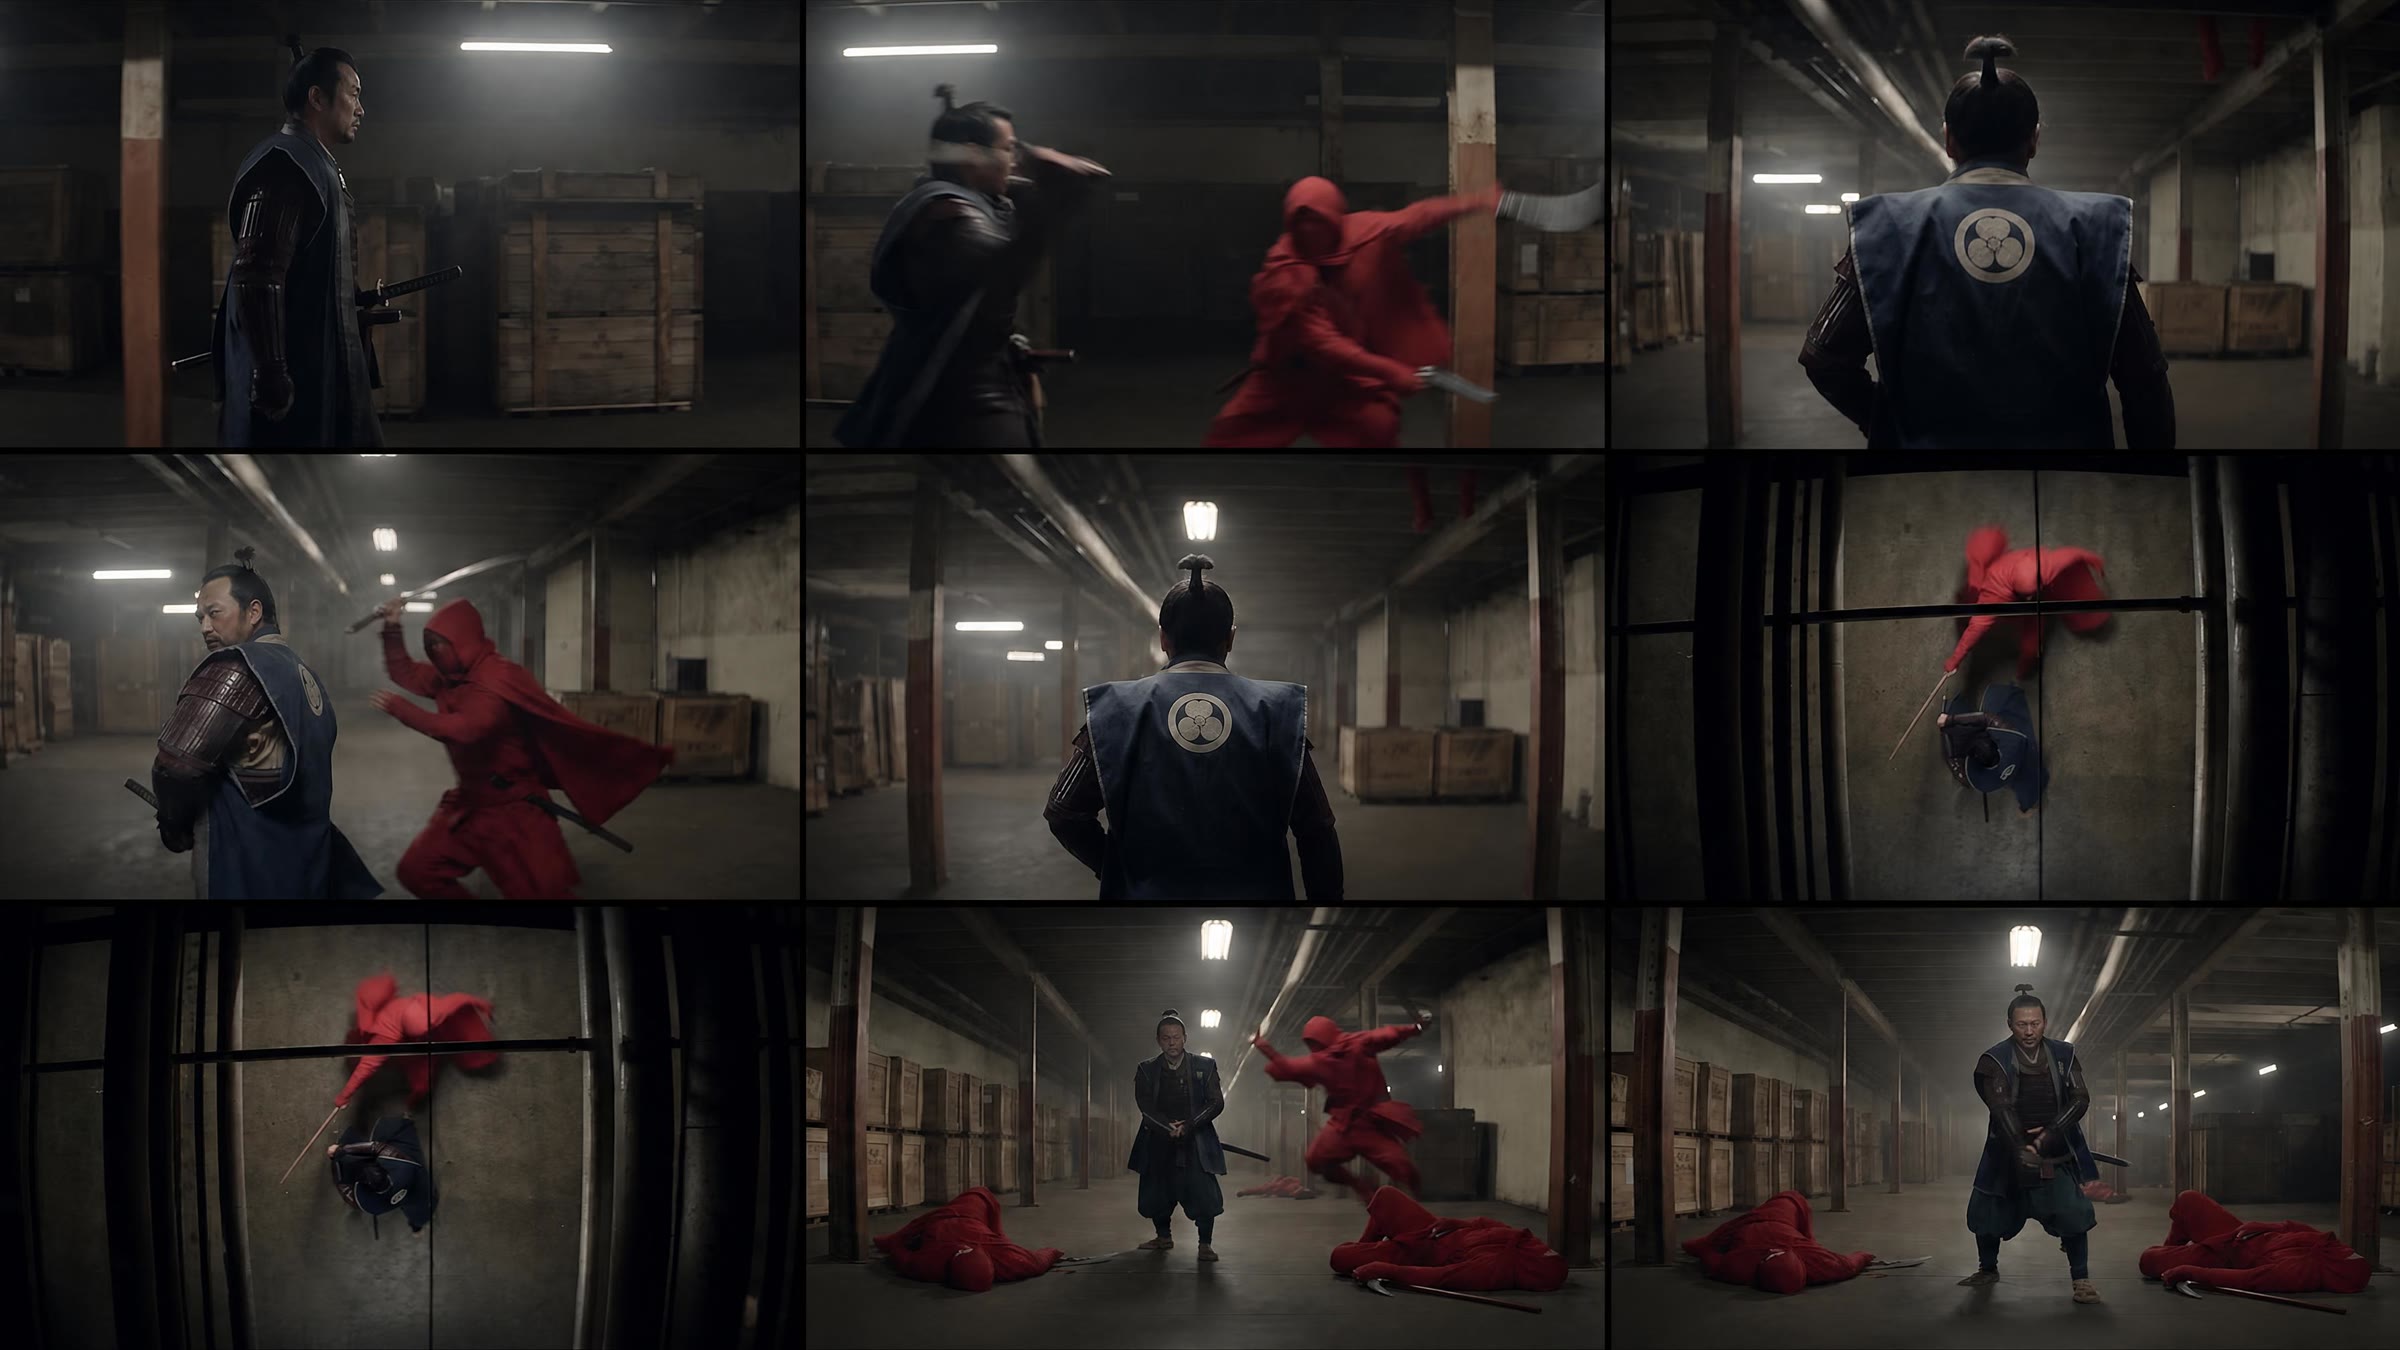
GPT Image 2 is the default for storyboards, but Nano Banana Pro and Seedream 5.0 give slightly different results, so it is worth switching if the first board misses. Once the proposal is generated, check what each panel is supposed to represent before you approve it. The agent gave me several boards to choose from, and I saved the one I liked for later.
If one panel is wrong, fix that panel instead of regenerating the board. This request added the missing attacker to panel four and stripped the frame numbers so the board could be used as a clean reference:
Turn the Storyboard Into the Clip
Once the board looks close to what I had in mind, I drop it back into the references with the character sheets and the warehouse plate and ask for the video. The model now follows nine keyframes and fills in the motion between them instead of inventing the whole sequence from scratch.
Double-check the proposal before you submit. I used Seedance 2.5 because it is the best video model for this, in 16:9 at 480p to save credits, 15 seconds long, in a batch of two so there are variations to choose from.

This is the video prompt behind that clip. The agent wrote it from the references; the storyboard decides the coverage, so the prompt only has to describe the choreography and the camera.
This is why storyboarding is so useful. AI video stops feeling like a slot machine. I am no longer hitting generate and hoping not to waste another 500 credits, because I already know roughly which shots I am going to get. That usually means fewer wasted generations, more predictable results, and more control over the camera angles and the sequence.
Generating the same idea without a storyboard is not necessarily bad. The problem is that you are accepting whatever the model decides to give you. Whenever you already have a specific shot or sequence in your head, storyboard it first.
The Same Approach Works for Anime
Storyboards are not tied to realism. For this anime example I did it in the other order: I generated the racing clip first, then had the agent lay its nine key frames out as a 3-by-3 board, so the sequence could be reused or corrected panel by panel.
The clip started from two short requests. The first take came back looking generic, so the second request named the reference points that mattered:

To turn the clip into a board, I screenshotted nine frames, attached them, and asked for the grid. No generation credits are needed for this step; the agent tiles the frames.
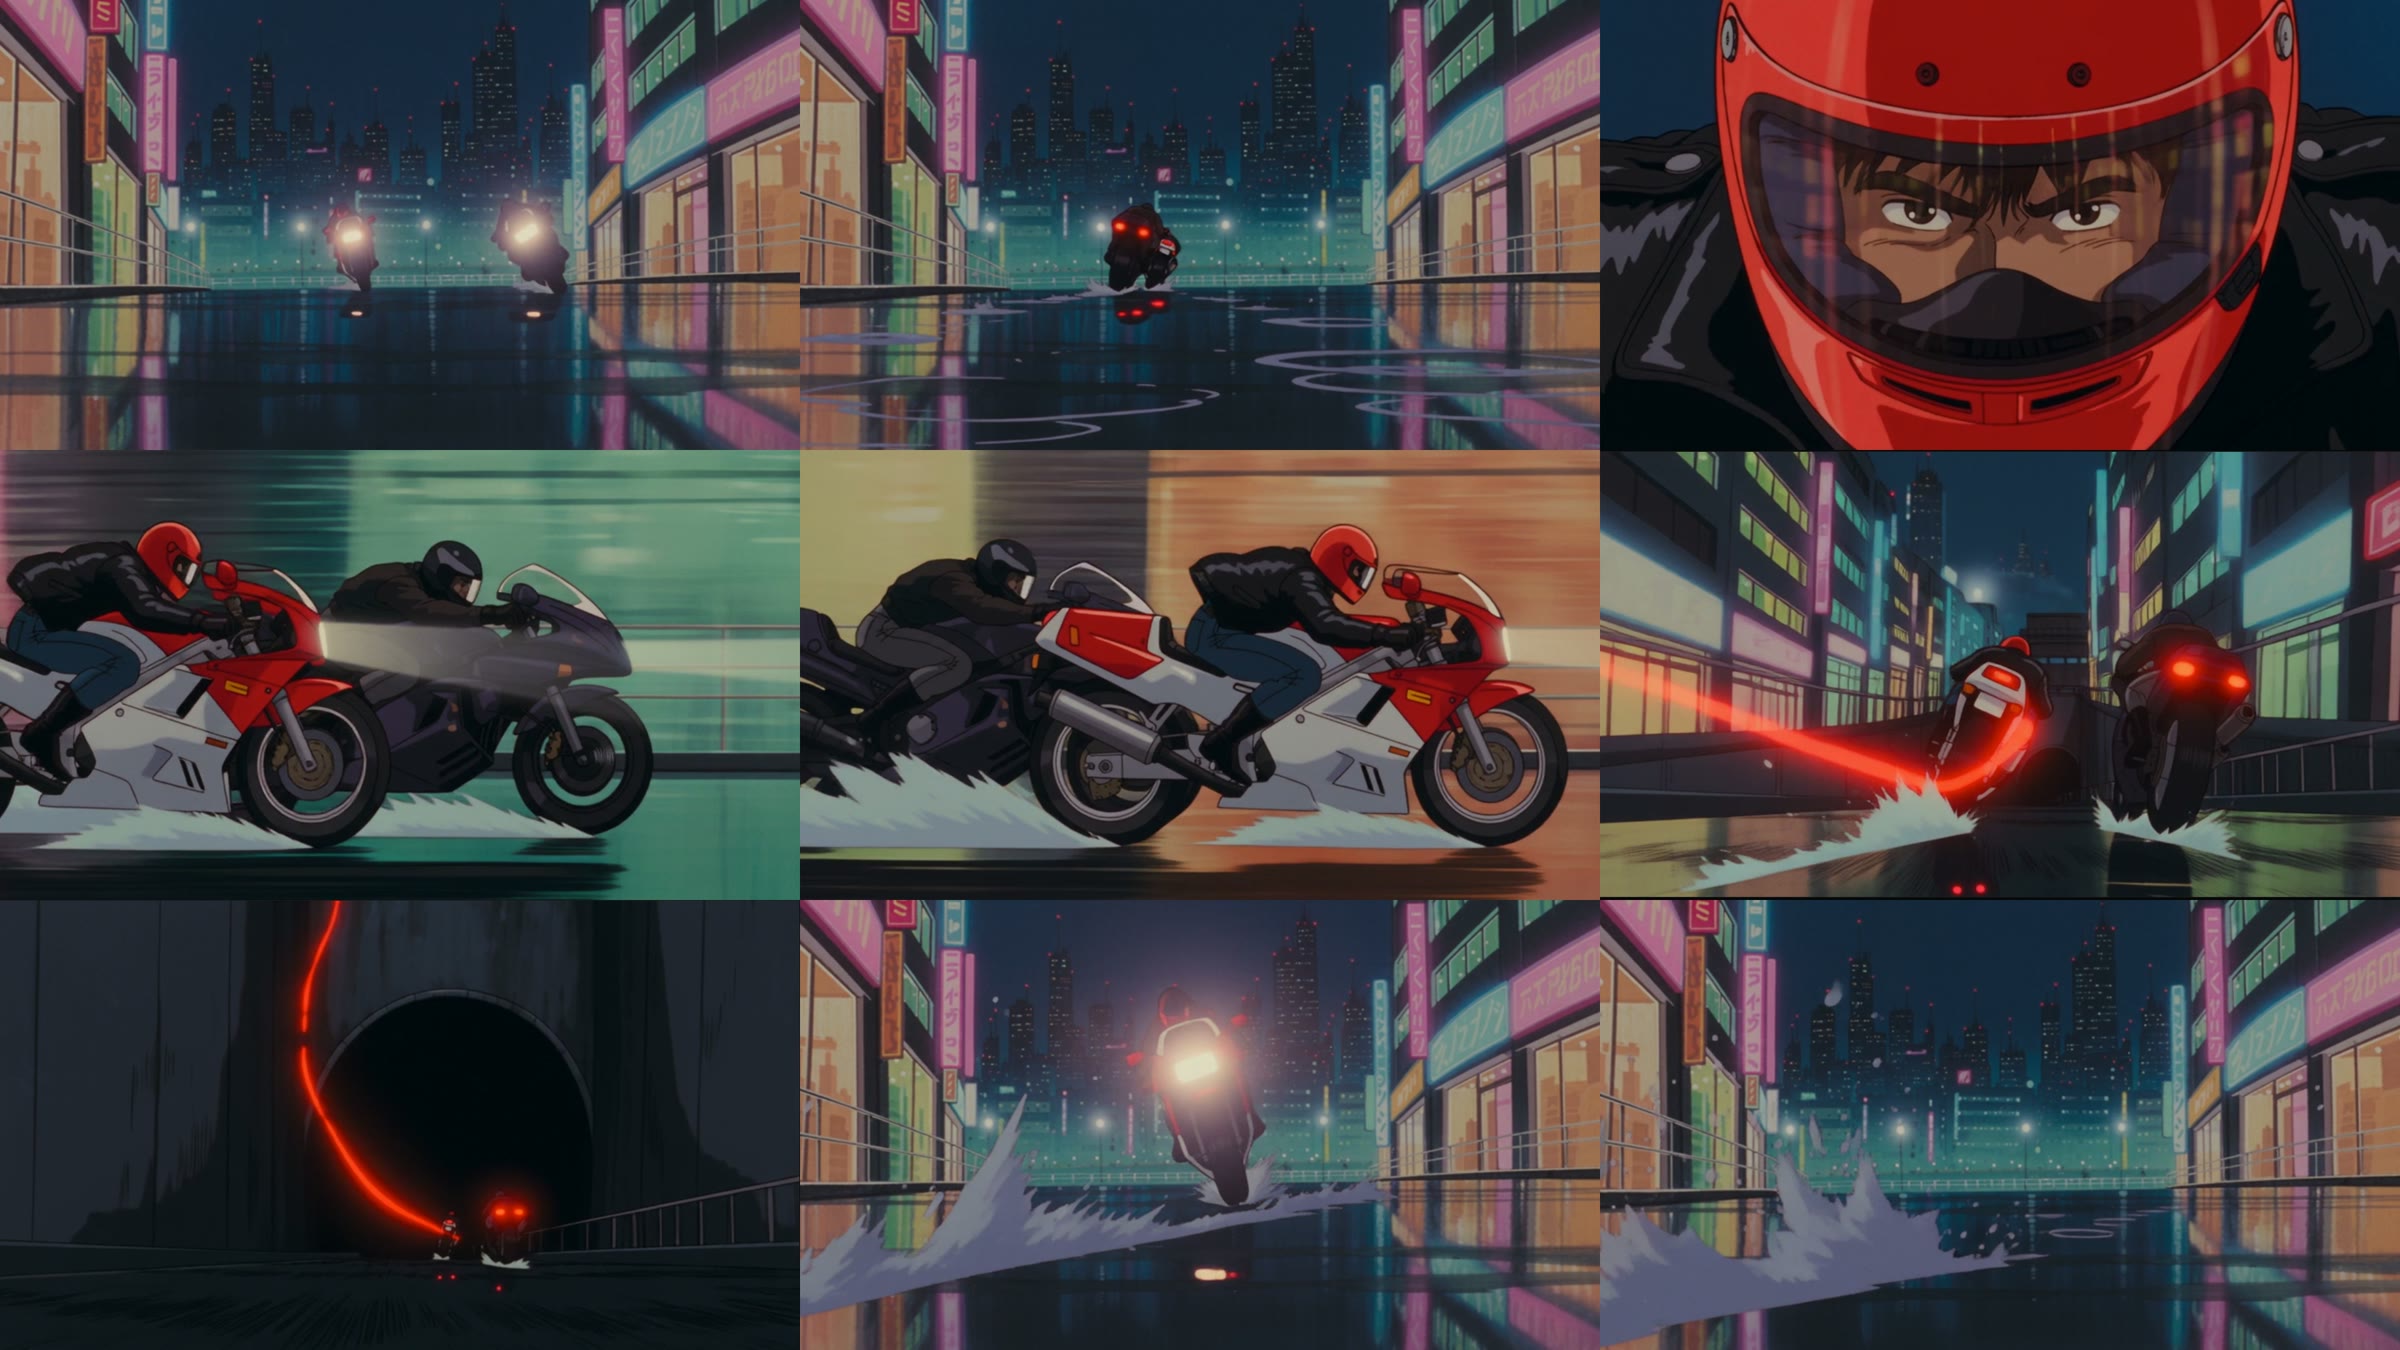
That board now works exactly like the samurai one. Swap a panel, reorder the beats, or attach it to the next video prompt and the model has a visual plan to follow.
2. Lock the Look With a Master Prompt
To keep a consistent style across a whole project you need a master prompt. AI video does not know what you mean by "make it cinematic," and you cannot ask for "a Christopher Nolan movie" either, because even his films do not look alike. Barbie looks nothing like Oppenheimer. If you want one consistent look, you have to define it for the model. Watch this section at 3:33.
For this project I wanted the unsettling visual language of the Backrooms: endless yellow rooms, flat fluorescent light, repeating architecture, and one person searching for an exit that never appears.
Turn Your References Into a Master Style Prompt
Start by gathering a few frames that capture the world you want to build. I pulled three stills from the recent Backrooms film, dragged them into the agent, and asked for the breakdown.
The agent analyzes the references and writes a style bible. Keep only the parts you need. I did not keep descriptions of the subject or the environment, because those change from shot to shot. What has to stay consistent is the visual language: color, lighting, contrast, texture, and mood. This was the final master prompt:
Master Style Prompt for Images and Video
Now open the agent settings, click Image instructions, paste the master prompt, and save. From this point you never have to repeat the style block. The agent already knows what the project is supposed to look like, and every new request only needs to say what changes.
Create an Element Sheet of Yourself
To put a consistent character into that world, you need a character reference. Upload a photo and ask the agent for an element sheet. This is mine, and the image prompt the agent wrote for it.
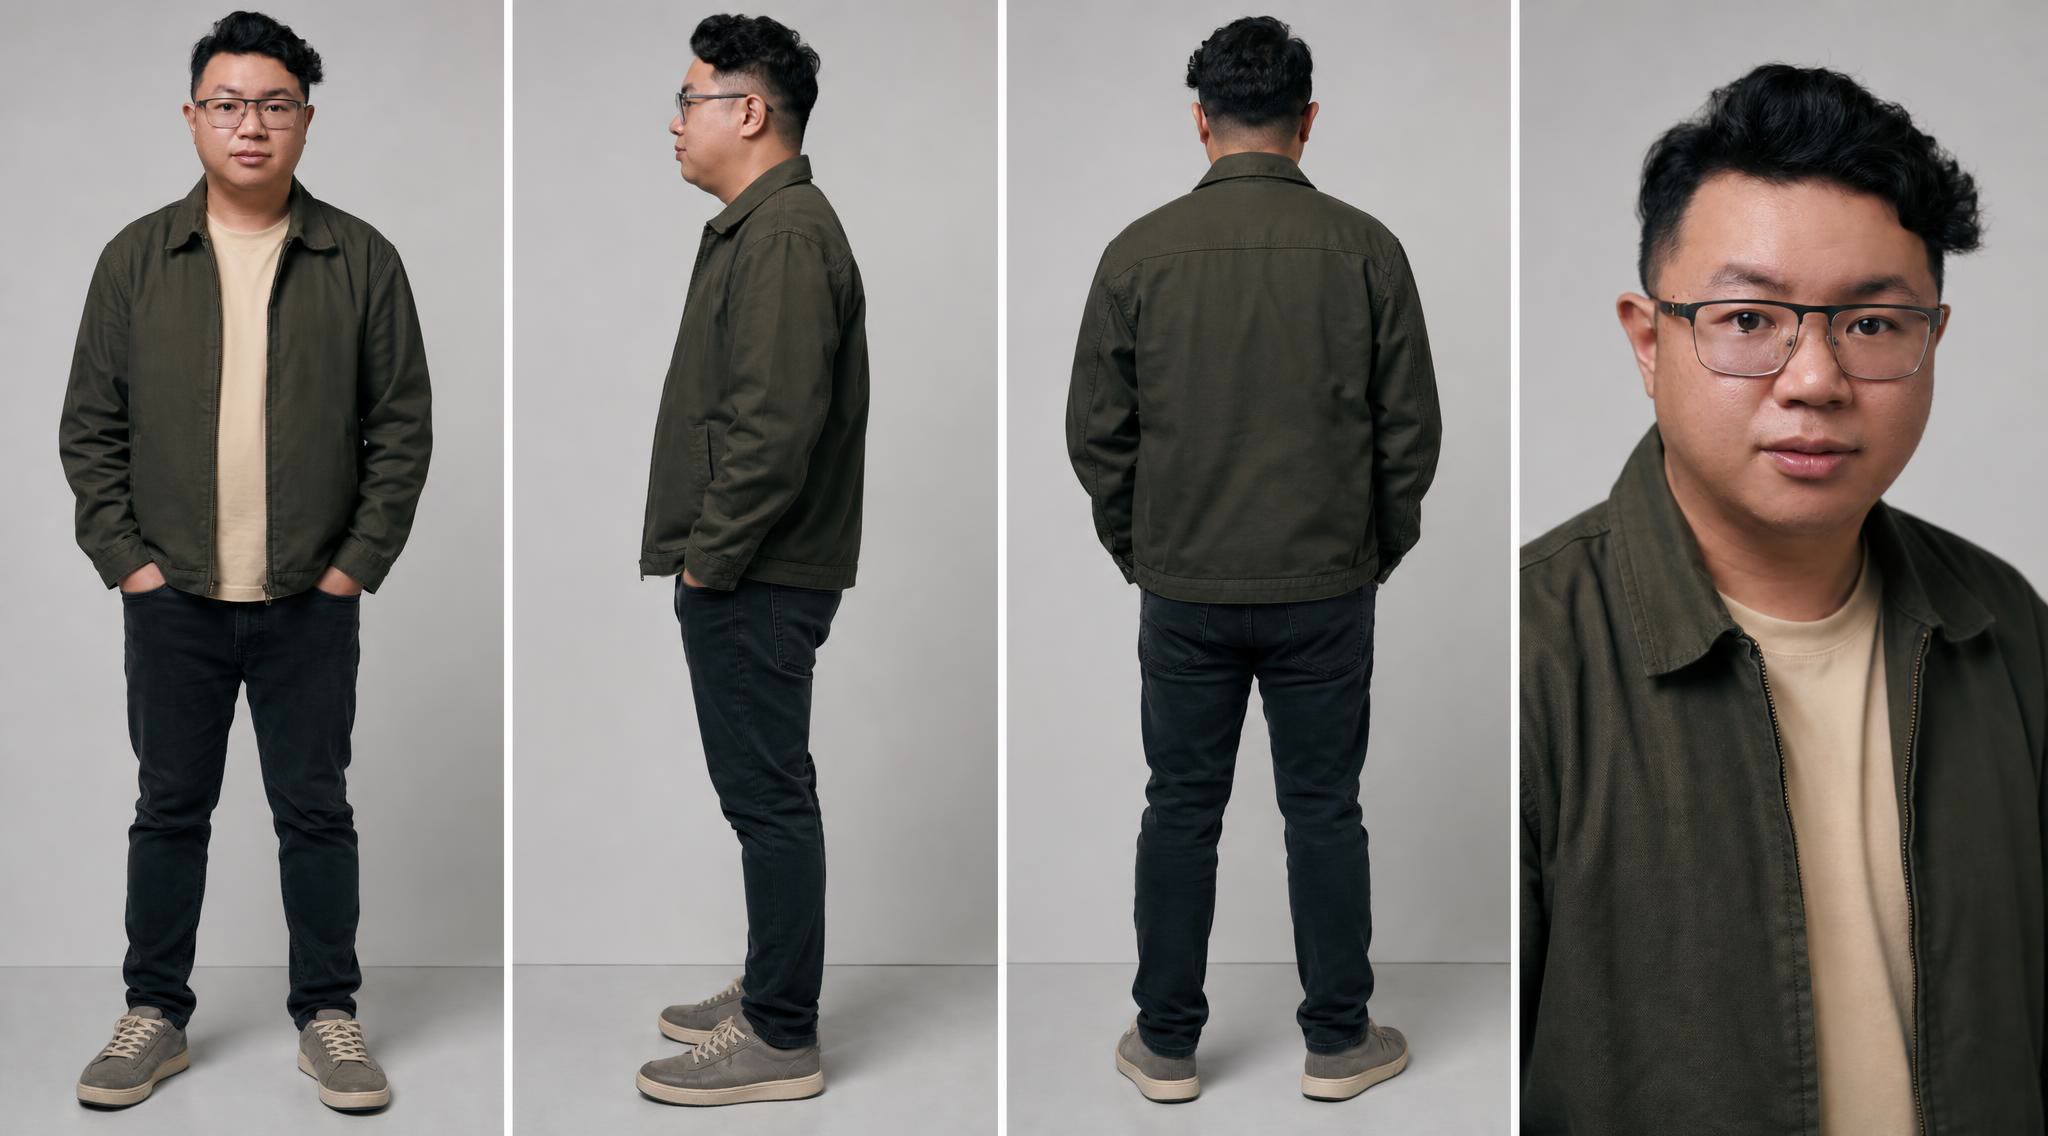
Put the Character in the World
With the master prompt saved and the sheet attached, the request can be one line.


This is the image prompt the agent generated for the hallway shot. Notice that it does not replace the master style. It translates that style into a specific composition, expression, wardrobe, and camera height.
Change the Scene, Not the Style
This is where the master prompt pays off. I can completely change what is happening without explaining the style again.


Do the Same for Video
Video works the same way. Go back to the agent settings, click Video instructions, paste the same master prompt, and save. Then attach a frame that defines the identity and the pose. I used a photo of myself chopping vegetables in a real kitchen and let the prompt re-grade the room into the Backrooms.
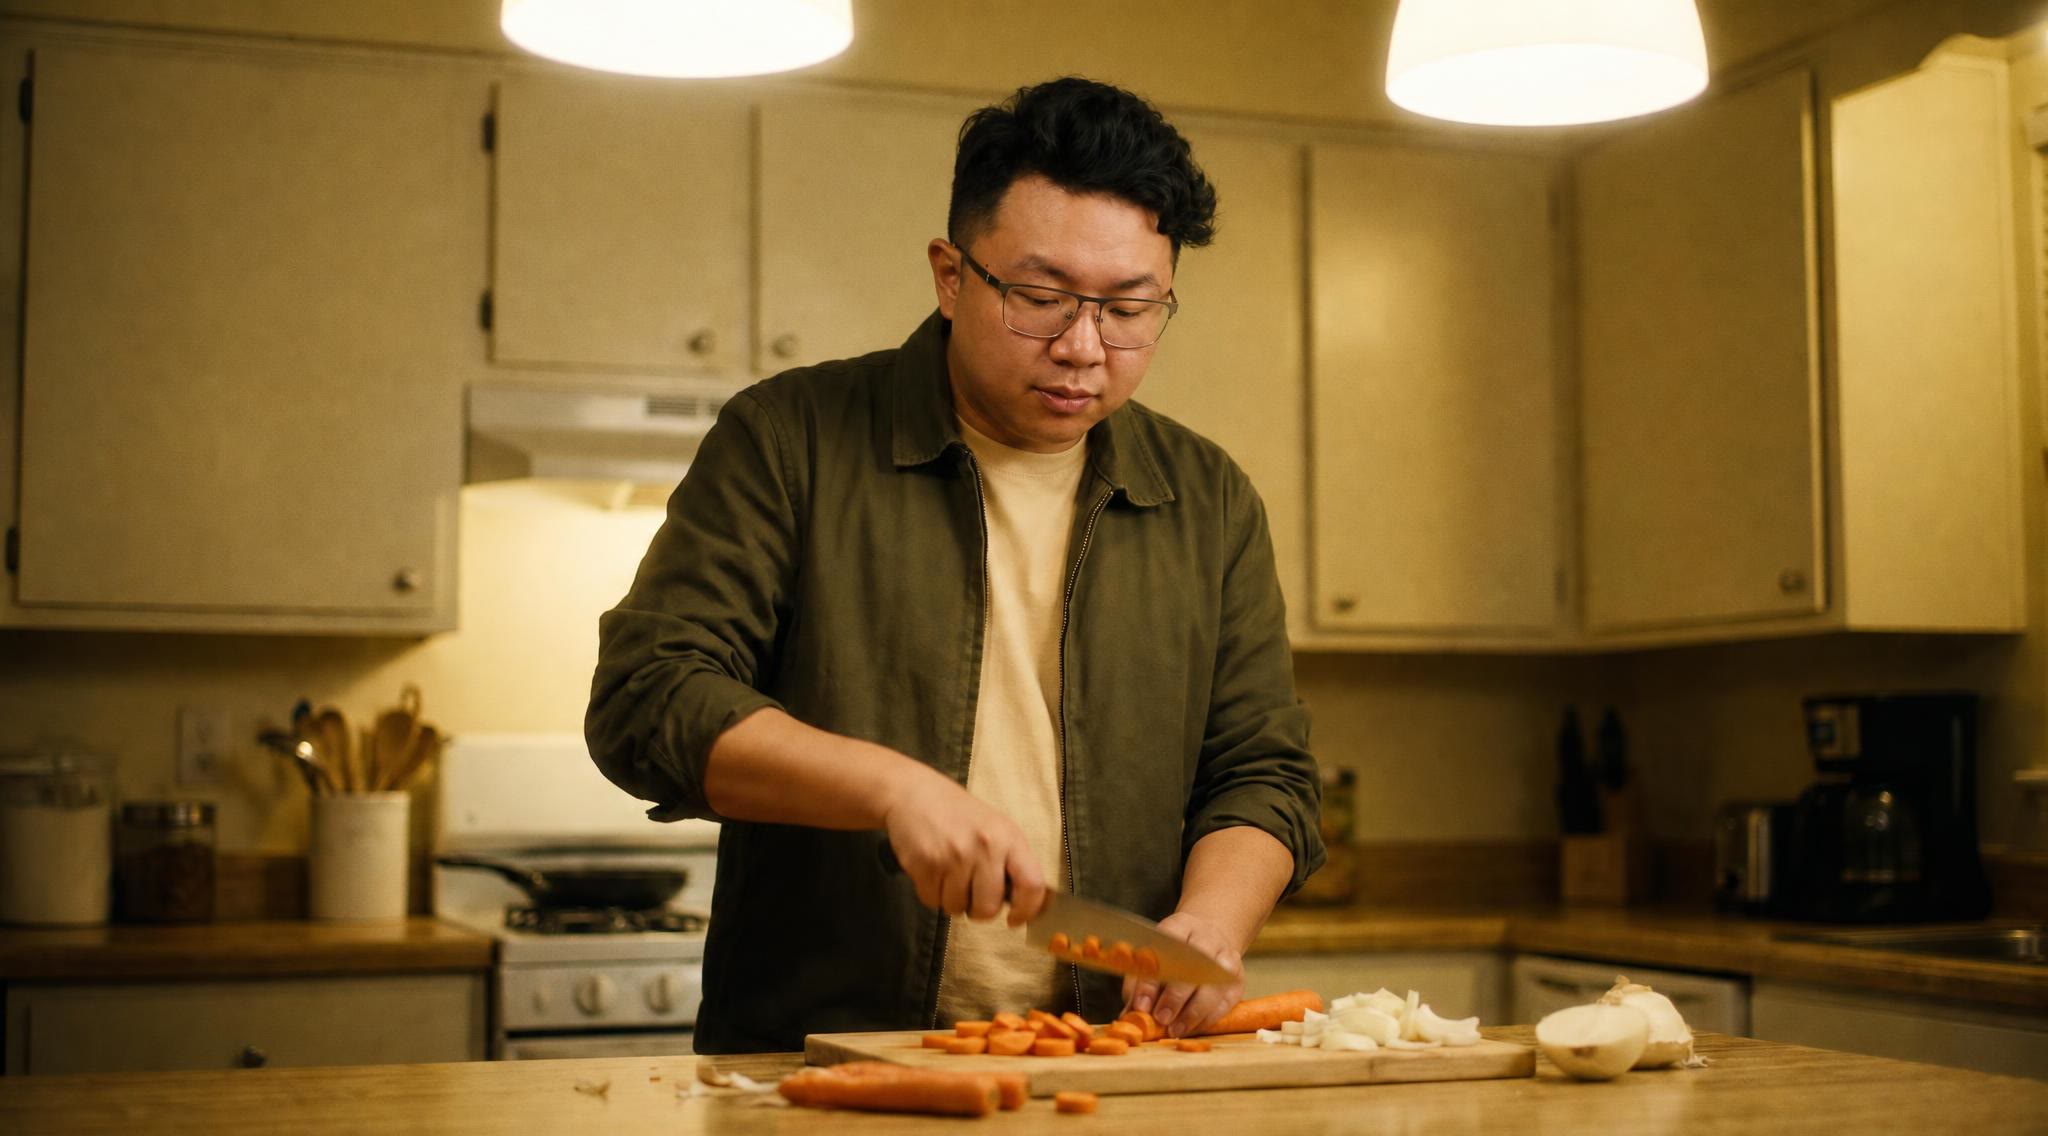
The agent proposed four clips. These are two of them with their exact prompts. Both were generated with Seedance 2.5 in 16:9 at 480p, 8 seconds each.


These prompts work because each clip gets one clear physical sequence. The environment is impossible, but the action stays simple and observable.
Now I can build an entire sequence shot by shot while keeping the same visual style throughout the film. The next scene was two messages: the request, then a note about the cut I wanted.

The explicit hard cut separates two clear beats: preparing to sleep, then realizing sleep is impossible. The instruction to avoid additional cuts stops the model from inventing coverage that weakens the moment.
3. Draw What You Cannot Describe
Sometimes I know exactly what I want but have no idea how to explain it in words. I end up writing a massive prompt about where the arms go, where the camera sits, and which direction the character faces, and the model still interprets it differently. When that happens, draw it. Watch this section at 7:09.
Turn a Sketch Into a Finished Frame
Nothing fancy. A stick figure in Photoshop with one leg forward, one leg back, and the arms roughly where I wanted them. Drop the sketch into the agent, attach the element sheet, and ask for the pose.


This is the image prompt the agent wrote. It reads the sketch for you and turns the stick figure into limb positions, which is the part that is so hard to describe from scratch.
When you submit the request, give each reference one job:
- The element sheet controls identity, wardrobe, and proportions.
- The sketch controls pose and composition.
- The master style prompt, if you have one saved, controls color, lighting, texture, lens, and mood.
This division of responsibility is more reliable than asking one reference to control everything. Once it works, each new pose is one line and one sketch. These three were "Do this," "Do this pose too," and "Can you make me a pose like this on a light gray studio background?"


Use Shapes to Guide Motion
The same idea works for movement. I drew three circles, animated them drifting upward, and uploaded that clip as a reference. The model turned the shapes into actual bubbles following the same beats, which would be nearly impossible to describe with text alone.


Go Further With Paths and Previs
The same trick scales up. For a specific FPV drone shot, draw the flight path directly onto the frame instead of writing a paragraph about the route. If you know Blender or 3ds Max, a rough 3D previs works as a reference video that guides the camera, the action, and the story beats. See both examples at 8:25.
A Reliable Prompt Structure for Every Shot
For each new generation, keep the prompt in the same order:
- Subject: Who is in the frame, what they are wearing, and what they do.
- Scene: The specific version of the environment.
- Composition or camera: Shot size, angle, lens, and movement.
- Lighting: The rules from the master style.
- Style: Color grade, texture, haze, distortion, and film treatment.
- Mood: The emotion the shot should create.
- Constraints: Anything that must not change, including cuts, identity, wardrobe, or props.
Repeating this hierarchy makes prompts easier to debug. If a result fails, you can usually identify whether the problem belongs to the subject, scene, camera, style, or motion instead of rewriting everything.
Final Checklist
Before you spend credits on a scene, confirm that:
- The shots exist as a storyboard, and every panel reads clearly.
- The characters and locations exist as reference sheets or plates.
- The master style prompt is saved in the agent's image and video instructions.
- Anything hard to describe has a sketch, a shape guide, or a previs behind it.
- Every clip has one readable action and no unnecessary camera cuts.
- The video prompt only describes what changes, not the whole world again.
That is the main idea behind all of these workflows. I am giving the model fewer things to guess: a storyboard, a locked style, a specific action, and much clearer direction. The less the model has to interpret on its own, the more likely the result matches what I had in mind, and the fewer retries it takes to get there.
If you want to see the same techniques carry a full short film, read how I made The Odyssey with Seedance 2.5.
Open Yapper Assistant, save your master prompt in the agent settings, and storyboard your first scene with Seedance 2.5.