Sep 1, 2026
AI Filmmaking
Why AI Videos Won't Follow Your Prompts (and How to Fix It)
Learn why AI video models ignore or distort prompts, and how storyboards, master style prompts, element sheets, and sketches give Seedance 2.5 fewer things to guess. Every asset and prompt from the video, ready to reuse.

AI video models often stop following a prompt when one generation is asked to invent the visual style, character, location, composition, action, and camera movement at the same time. The instructions compete with one another, so important details drift or disappear.

The fix is not one enormous prompt. It is a set of techniques that give the model fewer things to guess.

I spent over $1,000 in Seedance 2.5 credits learning which of those techniques actually work. The video above walks through the three that survived, and this article is its companion: the assets, the exact prompts, and the results from the sessions the video was recorded in, so you can copy the workflow instead of the theory.

The three techniques, with the timestamps in the video:

  1. Storyboard the shots before you generate so the model follows a visual plan instead of inventing the sequence.
  2. Lock the look with a master prompt so every image and clip shares one visual language.
  3. Draw what you cannot describe with sketches and shape guides that control pose, composition, and motion.

Every prompt below has a Use Prompt button that opens it in Yapper. The agent prompts go to Yapper Assistant. The image and video prompts go straight to the generator with the model already selected.

1. Storyboard the Shots Before You Generate

Before I shoot anything, I plan the shots, decide what I am trying to get, and work from that plan. The example in the video is a samurai fighting four ninjas inside a warehouse. Watch this section at 0:40.

Start With the Assets

Storyboards only work when the characters and the location already exist as references. For this scene I had three: a samurai element sheet, a squad of four red ninjas, and an empty warehouse plate.

Sengoku samurai element sheet: front, back, and close-up on white
Four red-cloaked ninjas side by side on a white background
Empty warehouse plate with crate racks and a single hanging light
The three references behind the scene: the samurai sheet and ninja squad (GPT Image 2) and the warehouse plate (Nano Banana Pro).

The samurai and the ninjas came from one request to Yapper Assistant.

I need two images. A samurai, like a Sengoku-period samurai, and red ninjas. For the samurai, generate an element sheet: three panels, full body front, side, and back, plus a medium close-up. For the ninjas, give them red cloaks and red ninja outfits. Give me four different ninjas in red outfits. All on white backgrounds, one image each.

The first batch came back looking like game characters, so the second request was the one that mattered. Say what was wrong and what you want instead:

Can you regenerate again? They look like high-end CGI characters. I need a realistic photo, realistic shot by camera.

These are the final image prompts the agent wrote for both sheets. Notice how much of each prompt is about the camera, the skin, and the fabric rather than the character.

Image Prompt: Samurai Element Sheet

Photorealistic studio photograph, shot on a full-frame DSLR with an 85mm portrait lens at f/5.6, on a pure white seamless paper background, three separate panels arranged left to right with clear gutters between them, no dividing lines, no text, no labels. Subject: a real Sengoku-period Japanese samurai warrior, an actual human model with visible skin pores, faint sweat sheen, and natural facial asymmetry — weathered face, topknot hairstyle (chonmage), wearing real lacquered lamellar do-maru armor in dark iron and deep red lacing with scuffs and wear, a linen haori surcoat with a simple mon crest, wide hakama trousers, straw waraji sandals, a katana and wakizashi at the hip with visibly frayed sageo cords, and a kabuto helmet with crescent maedate held under one arm. Layout: Panel 1 — full body, front view, standing neutral pose, arms relaxed, feet on an implied ground line. Panel 2 — full body, back view, same pose, same ground line and scale, showing armor back plates and helmet straps. Panel 3 — medium close-up from mid-chest up, three-quarter angle, same lighting, visible skin texture and individual hair strands. Lighting: soft, even studio softbox lighting from the front with a subtle catchlight in the eyes, faint natural shadow falloff on the white backdrop, consistent across all three panels. Style: photojournalistic realism, true-to-life skin and fabric texture, natural color grading, shallow depth of field on the face in panel 3, no illustration linework, no painterly rendering, no CGI sheen, no plastic-looking skin, no text, no captions.

Image Prompt: Red Ninja Squad

Photorealistic studio photograph, shot on a full-frame DSLR with a 50mm lens at f/6.3, on a pure white seamless paper background, one wide image divided into four clearly separated full-body panels side by side, no dividing lines, no text, no labels. Subject: four real human models each dressed as a ninja in a full red outfit — fitted red shinobi shozoku fabric with visible weave and fold creases, a red hooded cowl wrapped across the lower face, red fingerless gloves, red tabi boots — each draped in a flowing red cloak with real fabric drape and slight motion blur at the hem from a faint breeze. Layout: each of the four panels shows one ninja standing full body, front three-quarter view, neutral ready stance, same ground line and body scale across all four so they read as a matched squad. Vary each ninja's build, height, weapon (katana on the back, twin kunai at the belt, a chain-sickle, a bo staff), and cloak trim wear so each is individually recognizable as a distinct real person. Lighting: soft, even studio softbox lighting from the front with subtle rim light separating the red cloaks from the white backdrop, consistent across all four panels. Style: photojournalistic realism, true-to-life fabric and skin texture visible around the eyes, natural color grading, no illustration linework, no painterly rendering, no CGI sheen, no plastic-looking skin, no text, no captions.

The warehouse started as a photo. I attached it and asked for a people-free wide shot, which gave me a clean plate to reuse in every panel.

Generate a wide-angle shot of this warehouse. No people inside. Realistic cinema realism.
Cinematic film still, empty warehouse interior. Use the environment from the reference image — same concrete support columns, tall wooden crate racks along both walls, ceiling pipework, and hanging light — but reshoot from a slightly elevated three-quarter wide-angle angle with no people present. Composition: Wide-angle lens positioned a few meters up and to one side, framing the full width and depth of the space so multiple crate rows and pillars are visible receding into soft darkness at the back. Lighting: Practical fluorescent fixture as the sole key light, warm glow pooling directly beneath it, ambient spill reflecting faintly off the concrete floor and crate edges, deep shadow in the corners. Style: Grounded cinema realism, slight film grain, muted industrial color grade (cool grays and browns with a warm light source), sharp material detail on wood and concrete, floor completely clear of any figures or clothing piles.

Ask for a Nine-Panel Storyboard

With the three references attached, I asked for a 3-by-3 storyboard and listed the shots I already had in mind. Nine panels is the sweet spot. It gives you enough coverage to build a sequence while keeping each frame big enough to read. Sixteen panels squeezed into one image get too small to be useful.
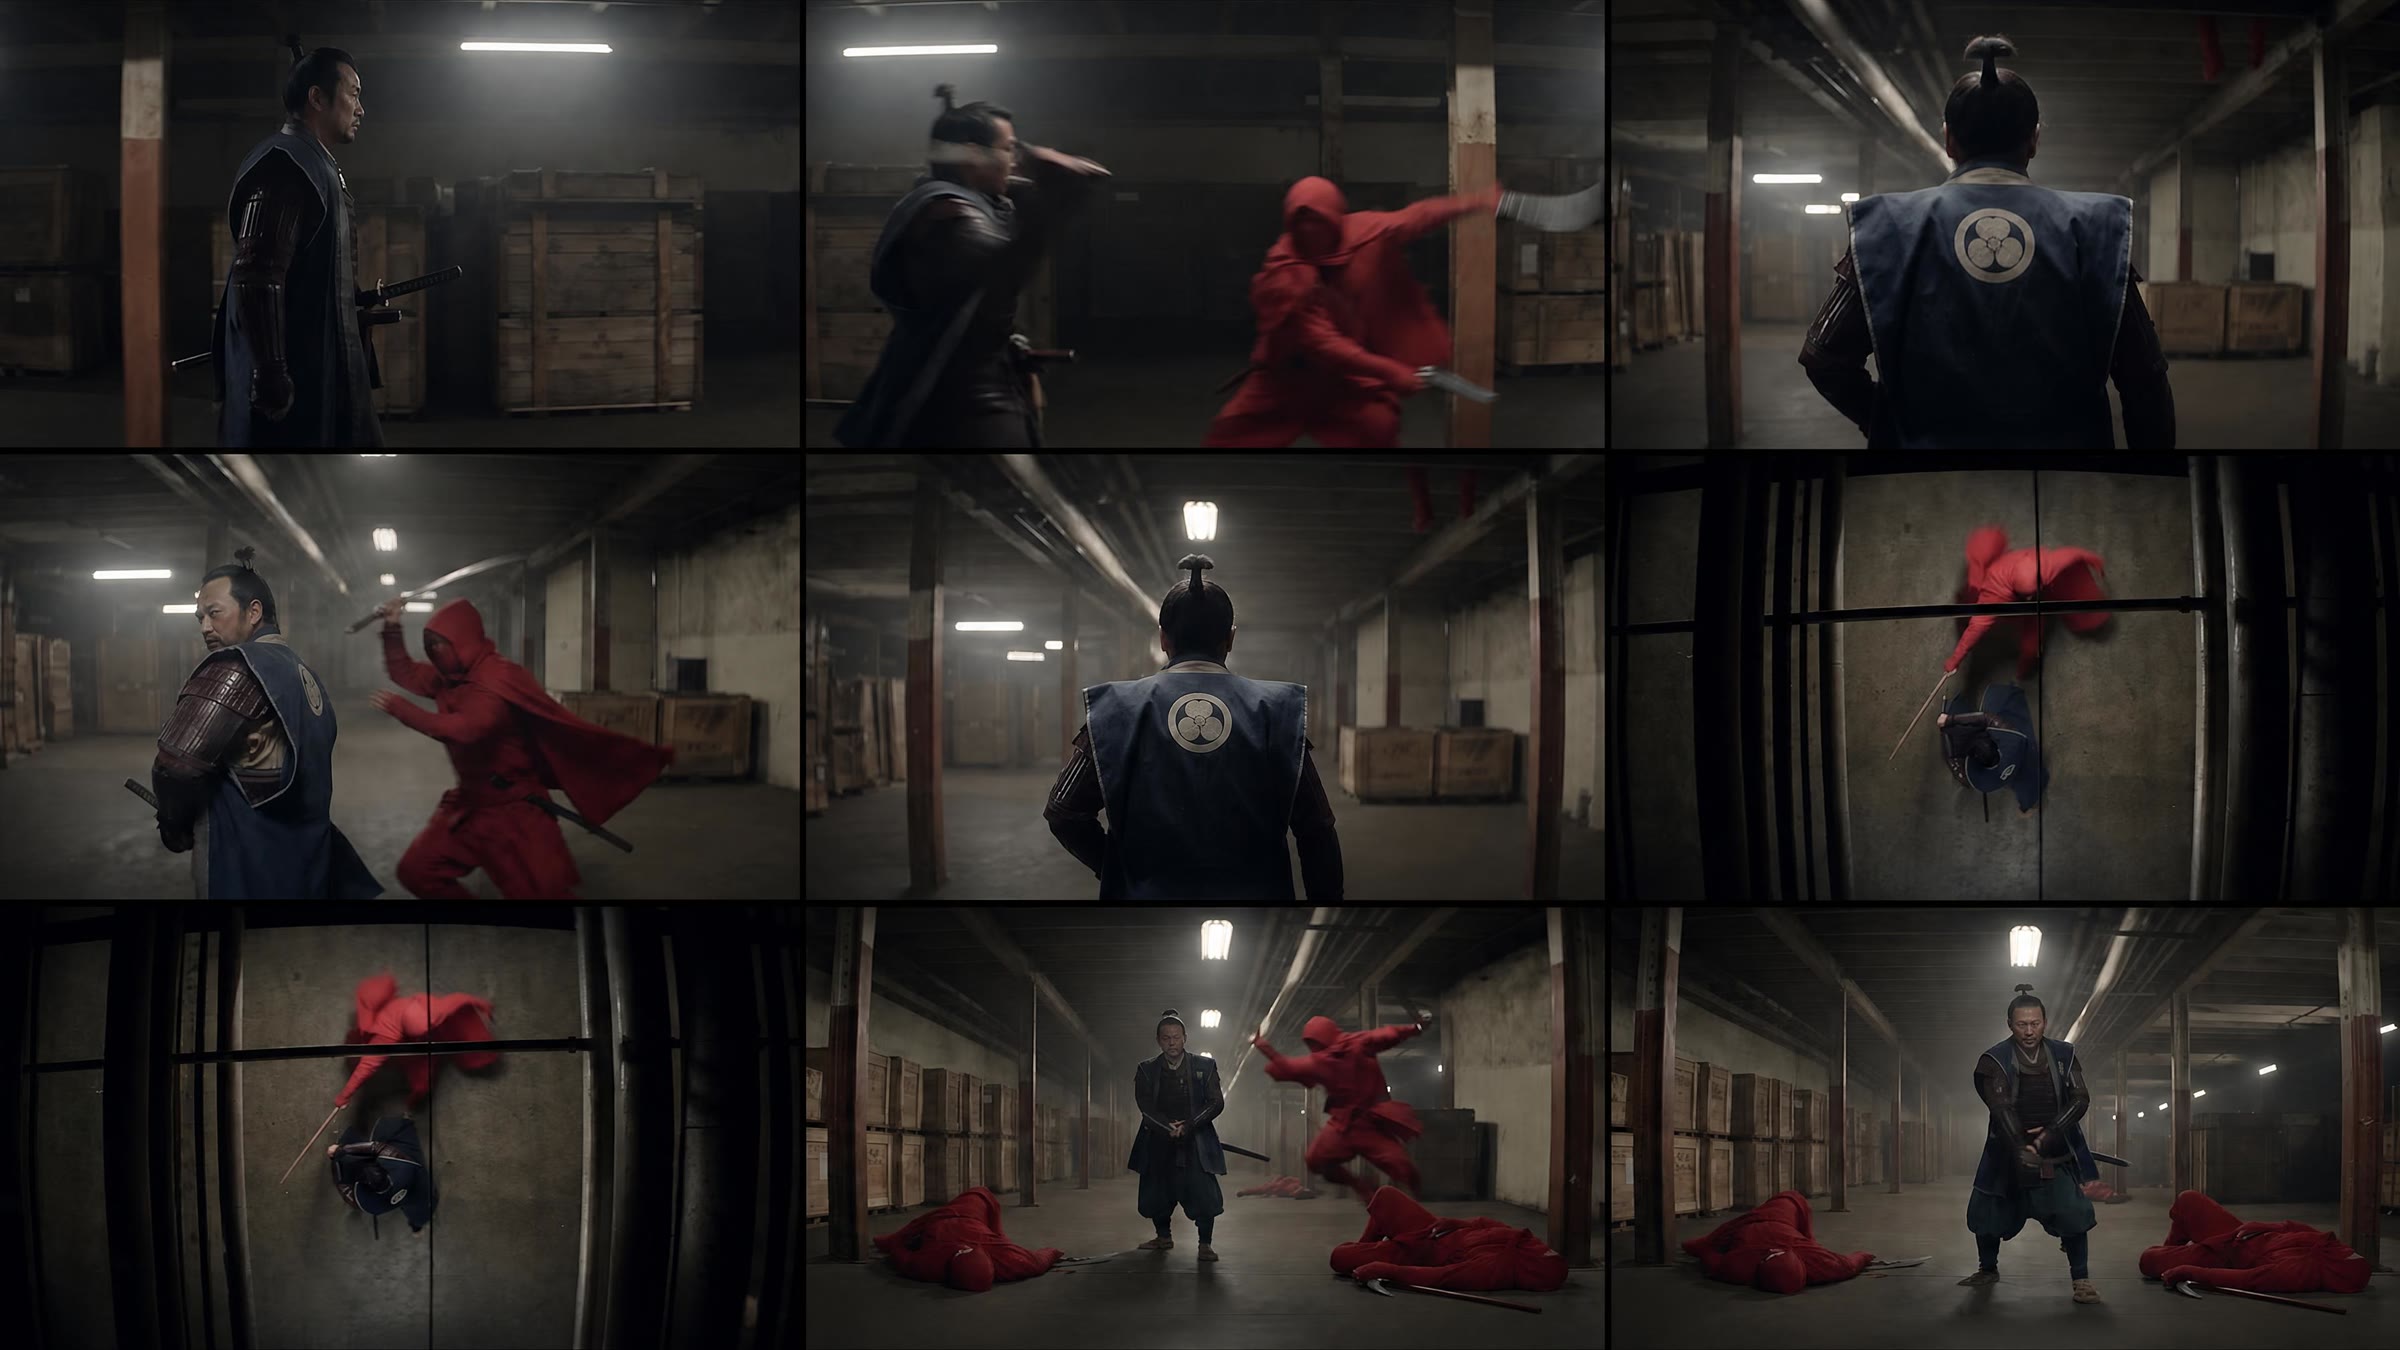
Create a 3x3, 9 panel storyboard for my action scene. Create a scene where the samurai is fighting the ninjas in the warehouse. Shots in sequence: Side shot: Samurai runs through the warehouse, drawing his katana. Medium: First ninja lunges with a kunai. Action shot: Samurai slashes him down. Low rear shot: Second ninja drops with a chain-sickle. Medium: Samurai ducks and cuts him down. Top-down: Third ninja charges; samurai deflects the bo staff and strikes. Low front shot: Final ninja rushes with twin kunai. Action shot: Samurai lands one decisive slash. Wide: Samurai stands among four fallen ninjas, katana lowered.
The final nine-panel storyboard: side shot, ninja lunge, back shot, flanking ninjas, top-down exchanges, and the samurai standing over four fallen ninjas

GPT Image 2 is the default for storyboards, but Nano Banana Pro and Seedream 5.0 give slightly different results, so it is worth switching if the first board misses. Once the proposal is generated, check what each panel is supposed to represent before you approve it. The agent gave me several boards to choose from, and I saved the one I liked for later.

If one panel is wrong, fix that panel instead of regenerating the board. This request added the missing attacker to panel four and stripped the frame numbers so the board could be used as a clean reference:

@samurai-grid Panel four: can you add a red ninja attacking instead of leaving it empty? Do not change the other panels. Also remove all the text.

Turn the Storyboard Into the Clip

Once the board looks close to what I had in mind, I drop it back into the references with the character sheets and the warehouse plate and ask for the video. The model now follows nine keyframes and fills in the motion between them instead of inventing the whole sequence from scratch.

Using these characters and the storyboard, create a 15-second fight sequence.

Double-check the proposal before you submit. I used Seedance 2.5 because it is the best video model for this, in 16:9 at 480p to save credits, 15 seconds long, in a batch of two so there are variations to choose from.

One of the two 15-second takes. Seedance 2.5, 16:9, 480p, generated from the samurai sheet, the ninja squad, and the warehouse plate.
0:00/0:00
One of the two 15-second takes. Seedance 2.5, 16:9, 480p, generated from the samurai sheet, the ninja squad, and the warehouse plate.

This is the video prompt behind that clip. The agent wrote it from the references; the storyboard decides the coverage, so the prompt only has to describe the choreography and the camera.

Characters: the samurai from reference image 1, in his dark indigo armor, drawing his katana. Four masked red-cloaked ninjas matching reference image 2 (sickle-chain, twin knives, staff, and curved blade) surround him. Scene: match the environment of reference image 3 — the dim column-lined warehouse aisle with stacked wooden crates, hanging fluorescent fixtures, and drifting haze. Action: wide shot, the samurai stands centered between the crate rows as the four ninjas close in from both sides. He pivots and draws his blade in one motion, cutting down the staff-wielding ninja with a single stroke. Camera slowly arcs around the fight at eye level, staying wide enough to read all five bodies in frame. A second ninja swings the sickle-chain; the samurai ducks under it and counters with a rising slash. He parries the knife-wielder's stabbing thrusts with his forearm guard and throws him into a stack of crates. Camera pushes into a tighter medium shot as the last ninja charges with the curved blade; the samurai meets him blade-to-blade, overpowers the lock, and delivers a final sweeping cut. He ends standing alone amid the fallen ninjas, breathing steady, blade lowered at his side. Lighting: motivated only by the warehouse's dirty fluorescent tubes and distant amber light, soft halation, low-key underexposed image, deep shadows. Audio: cloth rustle, katana draw and impact sounds, grunts and footsteps on concrete, no music.

This is why storyboarding is so useful. AI video stops feeling like a slot machine. I am no longer hitting generate and hoping not to waste another 500 credits, because I already know roughly which shots I am going to get. That usually means fewer wasted generations, more predictable results, and more control over the camera angles and the sequence.

Generating the same idea without a storyboard is not necessarily bad. The problem is that you are accepting whatever the model decides to give you. Whenever you already have a specific shot or sequence in your head, storyboard it first.

The Same Approach Works for Anime

Storyboards are not tied to realism. For this anime example I did it in the other order: I generated the racing clip first, then had the agent lay its nine key frames out as a 3-by-3 board, so the sequence could be reused or corrected panel by panel.

The clip started from two short requests. The first take came back looking generic, so the second request named the reference points that mattered:

Create an anime racing clip. Around 15 seconds long, snappy cuts, lots of different shots. Street racers across a neon night city, make it a motorcycle race.
It's kind of bad. Can I make it more Ghibli anime-ish? Like Akira.
The Ghibli-meets-Akira take. Seedance 2.5, 16:9, 480p, 15 seconds, no reference images.
0:00/0:00
The Ghibli-meets-Akira take. Seedance 2.5, 16:9, 480p, 15 seconds, no reference images.
Style: hand-painted 1980s-90s Japanese cel anime, painterly Studio Ghibli-style backgrounds with soft atmospheric color and visible brushwork, blended with Akira-style gritty motorcycle-chase energy — heavy motion-blur speed lines, dramatic sharp shadows, retro anime film grain, no modern CGI sheen. Scene: a rain-slicked night city street, glowing neon signage in pink, cyan and amber reflected on wet asphalt, hand-painted skyline with soft atmospheric haze and glowing windows in the distance. Characters: an anime motorcycle racer in a black leather jacket, red visor helmet reflecting neon streaks, riding a sleek red-and-white sportbike with a glowing underglow, racing neck and neck with a rival on a dark sportbike. segments: [0-4s] Low wide shot: the two bikes rocket toward camera then past it side by side, leaning hard into a corner, spray kicking off the wet asphalt, painterly neon reflections smearing across the street. Hard cut. [4-7s] Tight close-up on the rider's visor, city lights and a glowing speedometer HUD reflected across the glass, knuckles flexing on the throttle, retro anime linework on the helmet. Hard cut. [7-11s] Side tracking shot at bike height: the racer cuts inside the rival, back wheel sliding slightly, hand-painted shopfronts streaking past in a blurred wall of color. Hard cut. [11-15s] Low rear three-quarter shot: the racer pulls ahead and leans hard, diving into a glowing tunnel mouth, red taillight trail stretching behind as the rival falls back and the tunnel swallows the frame. Cuts only at the specified points, the camera does not cut on its own. Audio: roaring engines, screeching tires, driving synth pulse.

To turn the clip into a board, I screenshotted nine frames, attached them, and asked for the grid. No generation credits are needed for this step; the agent tiles the frames.
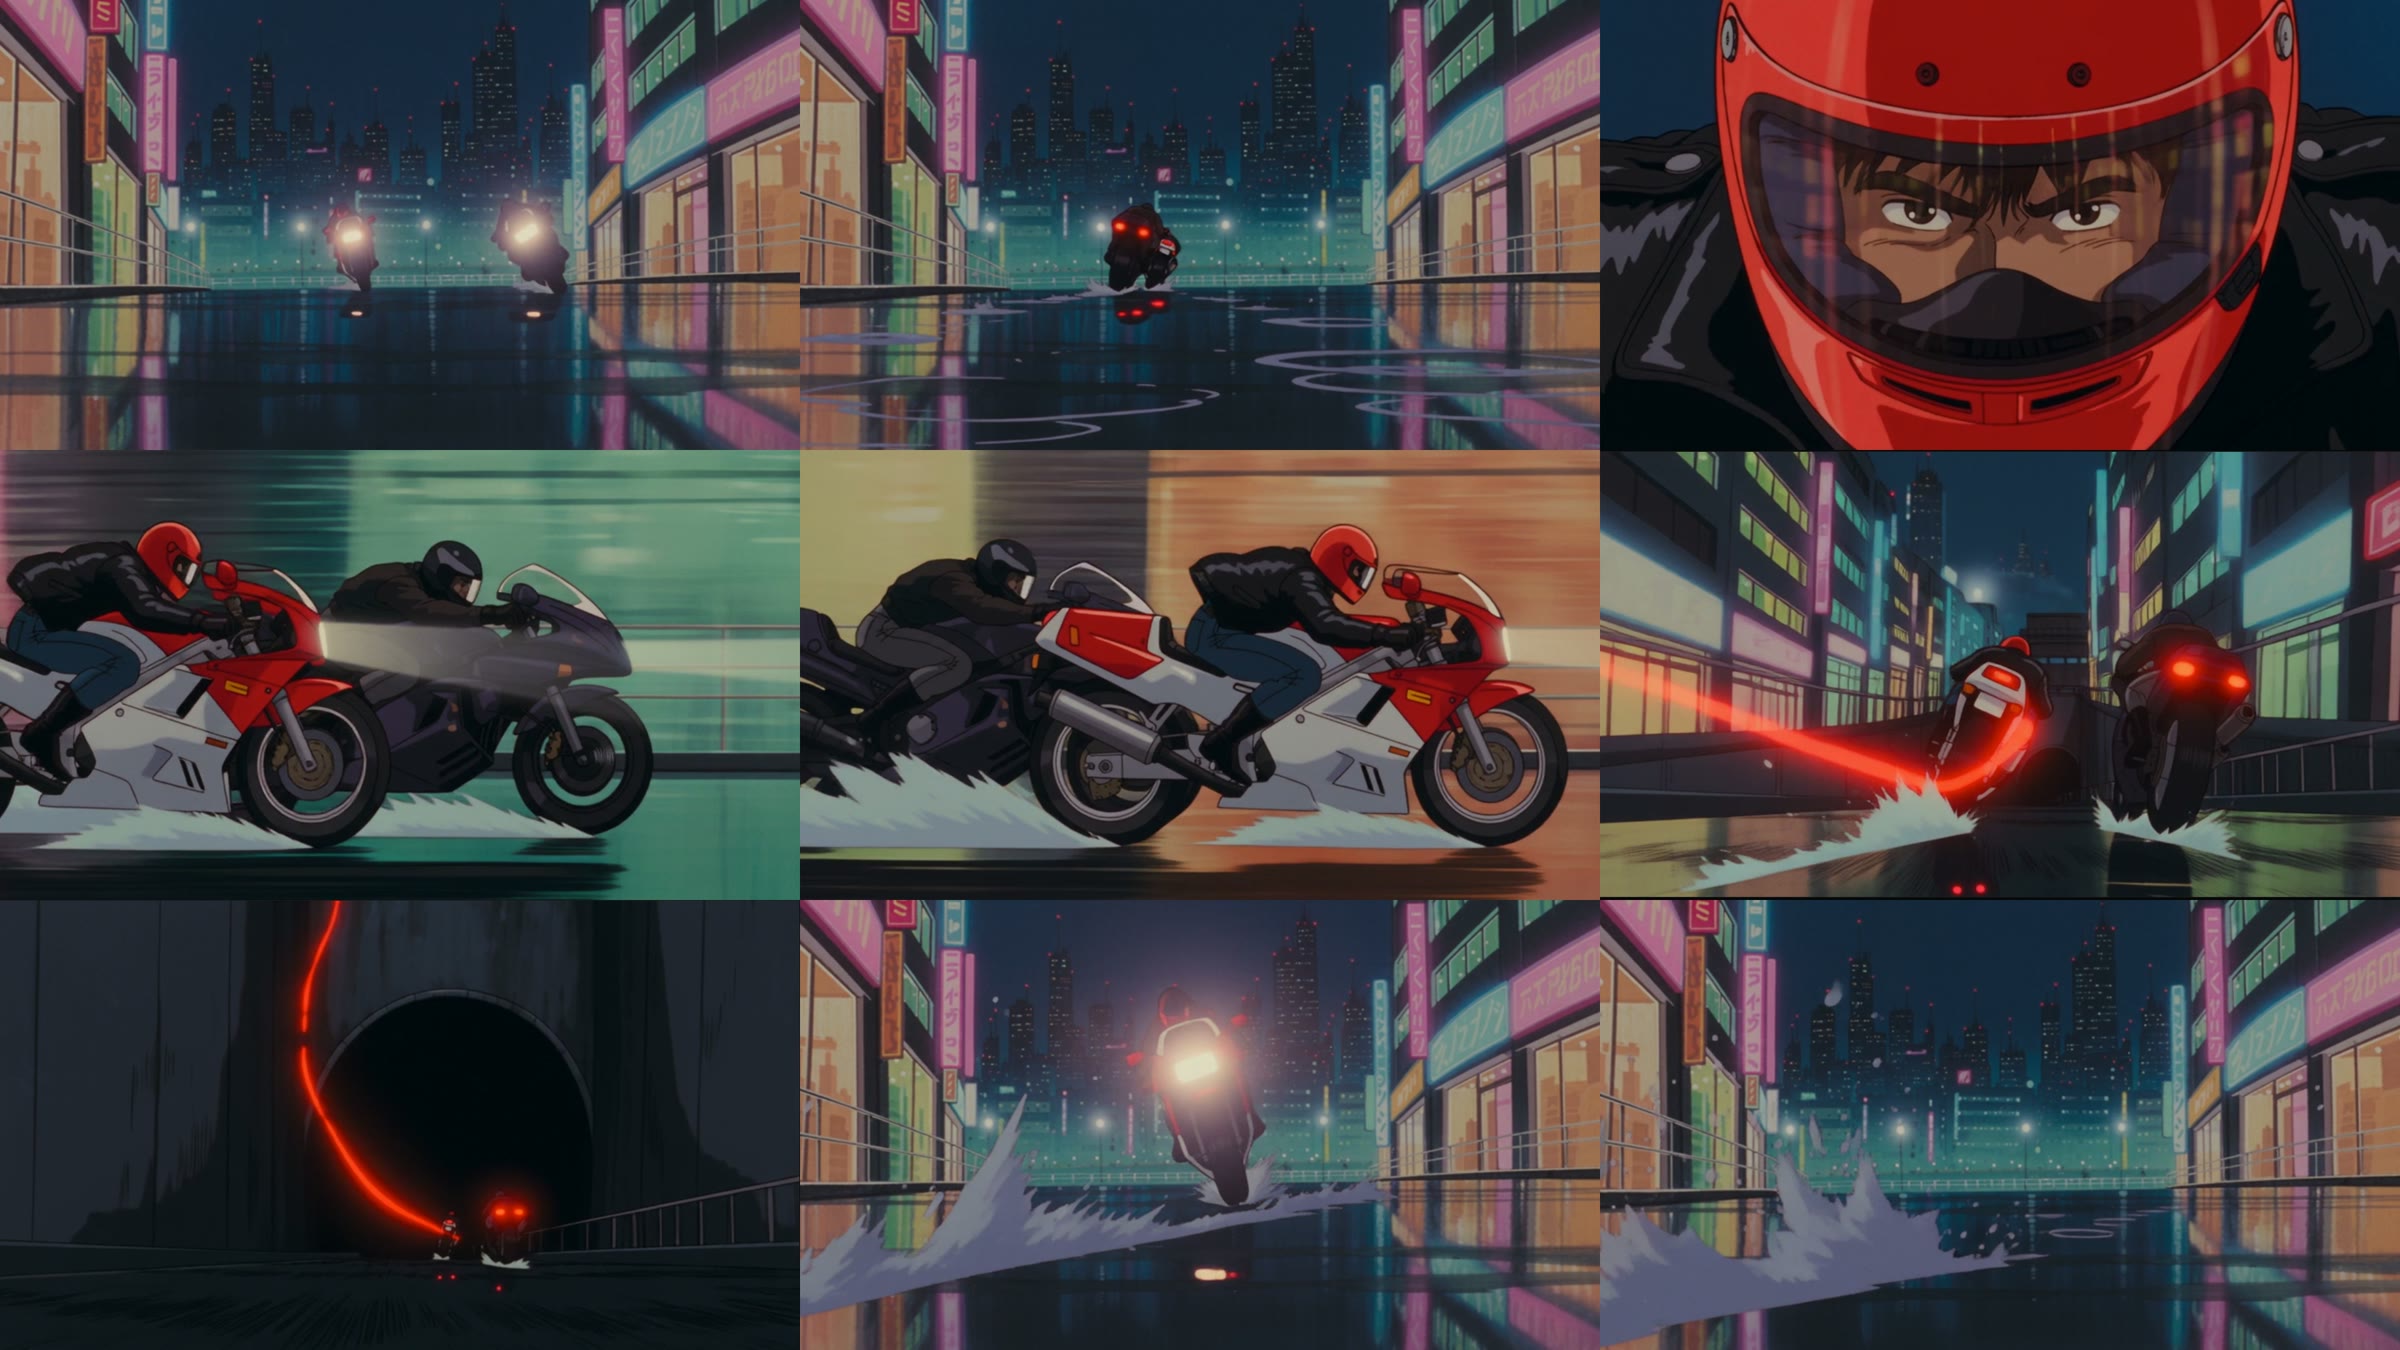
Take these nine frames and make them into a 3x3 storyboard, 16:9. No text or labels.
Nine-panel anime storyboard: the bikes approaching, a helmet close-up, side tracking shots, and the tunnel exit with a red taillight trail

That board now works exactly like the samurai one. Swap a panel, reorder the beats, or attach it to the next video prompt and the model has a visual plan to follow.

2. Lock the Look With a Master Prompt

To keep a consistent style across a whole project you need a master prompt. AI video does not know what you mean by "make it cinematic," and you cannot ask for "a Christopher Nolan movie" either, because even his films do not look alike. Barbie looks nothing like Oppenheimer. If you want one consistent look, you have to define it for the model. Watch this section at 3:33.

For this project I wanted the unsettling visual language of the Backrooms: endless yellow rooms, flat fluorescent light, repeating architecture, and one person searching for an exit that never appears.

Turn Your References Into a Master Style Prompt

Start by gathering a few frames that capture the world you want to build. I pulled three stills from the recent Backrooms film, dragged them into the agent, and asked for the breakdown.

Take a look at these references and write me a master prompt for this aesthetic. Analyze the color palette, lighting, texture, mood, and overall visual style. Then turn that into a prompt I can reuse across the whole project.

The agent analyzes the references and writes a style bible. Keep only the parts you need. I did not keep descriptions of the subject or the environment, because those change from shot to shot. What has to stay consistent is the visual language: color, lighting, contrast, texture, and mood. This was the final master prompt:

Master Style Prompt for Images and Video

Liminal-space “Backrooms” aesthetic: an endless, windowless labyrinth of identical office-basement rooms with damp drop-ceiling tiles, dated moist drywall, and worn commercial carpet. A monochromatic sickly yellow-beige color grade washes over every surface—walls, ceiling, floor, skin, and clothing all share the same jaundiced hue with almost no color separation. Flat, shadowless fluorescent lighting from recessed ceiling panels, with blown-out overexposed highlights on the light fixtures and no directional key light, gives the space a clinical ambient glow. Use a wide-angle lens with mild barrel distortion and soft edge falloff, like a consumer camcorder or analog found-footage capture, with subtle VHS grain and haze over the whole frame. Create deep one-point-perspective corridors with symmetrical vanishing lines, empty and vast, occasionally interrupted by piles of discarded furniture such as chairs, couches, or an old CRT monitor that suggest sudden abandonment. The composition isolates a lone figure, small within the oppressive scale of the space. The mood is uncanny, dreamlike, and quietly dreadful—deserted and repetitive rather than overtly violent, evoking the unsettling feeling of being somewhere you are not supposed to be.

Now open the agent settings, click Image instructions, paste the master prompt, and save. From this point you never have to repeat the style block. The agent already knows what the project is supposed to look like, and every new request only needs to say what changes.

Create an Element Sheet of Yourself

To put a consistent character into that world, you need a character reference. Upload a photo and ask the agent for an element sheet. This is mine, and the image prompt the agent wrote for it.
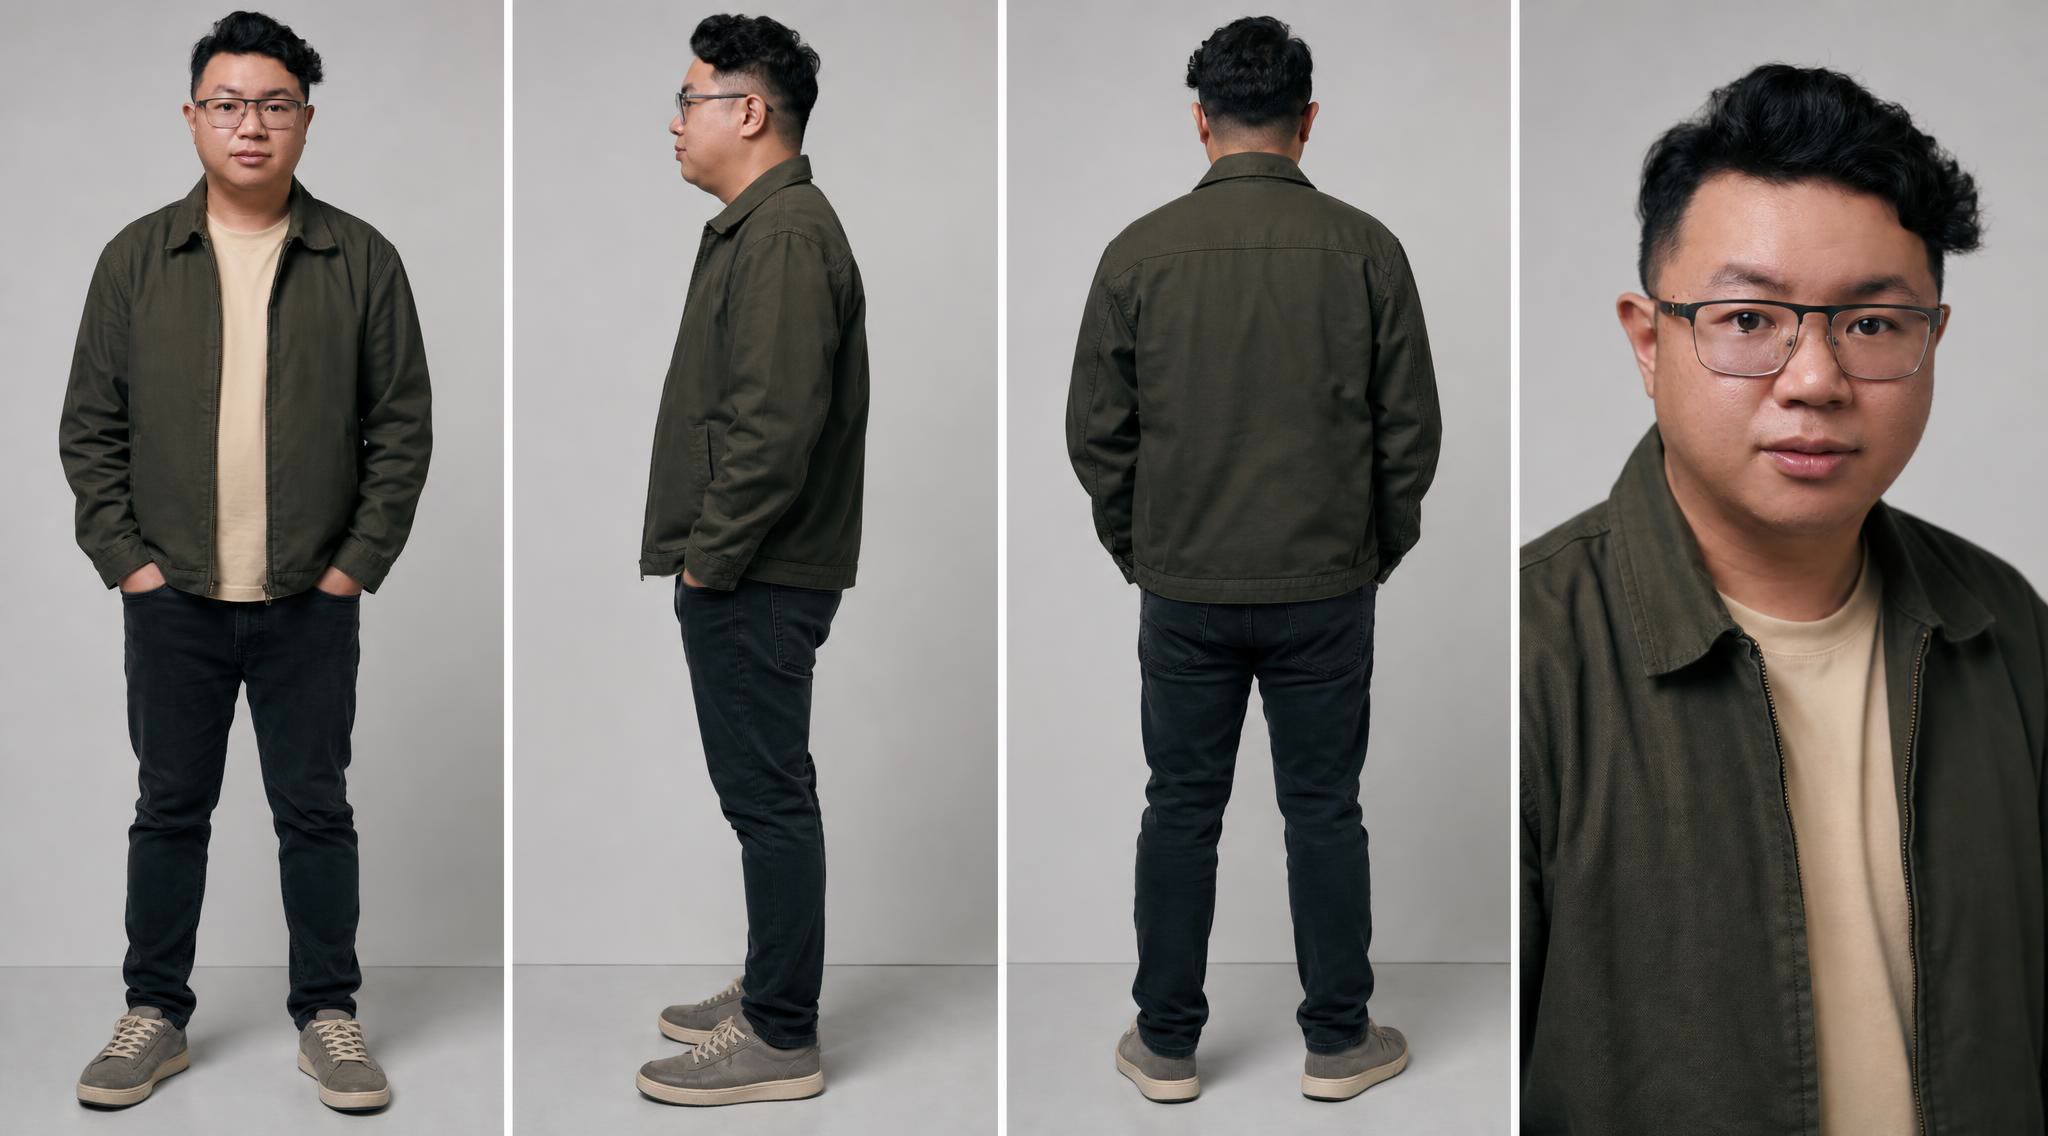
Four-panel element sheet of the character: front, side, back, and a close-up, on a light gray studio background
Four-panel character reference sheet on one canvas, neutral light-gray background, same ground line and visual scale across the full-body panels. Panel 1: full-body front view. Panel 2: full-body side profile view. Panel 3: full-body back view. Panel 4: medium close-up (head and shoulders), slight three-quarter turn, calm expression. The full-body panels can crop tightly at the top of frame and do not need the head fully visible. Match the identity, hairstyle, glasses, and clothing of the man in the reference image exactly — same olive-green zip jacket over a tan t-shirt, same build and proportions. A real documentary photograph, soft even studio daylight, 50mm lens, f/4, natural skin and hair texture, unretouched, no text or labels on the sheet.

Put the Character in the World

With the master prompt saved and the sheet attached, the request can be one line.

Put this guy in a similar room, looking for an exit.
The character walking toward the camera down a yellow office hallway under fluorescent panels
The character small in a deep one-point-perspective corridor with discarded furniture far down the hall
Two of the eight results. Nano Banana Pro, with the element sheet as the only reference.

This is the image prompt the agent generated for the hallway shot. Notice that it does not replace the master style. It translates that style into a specific composition, expression, wardrobe, and camera height.

Cinematic film still. Subject: the man from the reference image, wearing his olive jacket, tan shirt, dark jeans and glasses, walking toward camera down an identical liminal-space hallway, brow furrowed and mouth slightly open with a confused, searching expression as he scans for an exit that doesn't seem to exist. Composition: medium shot, camera at chest height, corridor continuing symmetrically behind him with a side passage branching off to one side, worn commercial carpet, damp ceiling tiles with recessed fluorescent panels overhead. Lighting: flat, shadowless fluorescent glow from the ceiling panels with blown-out highlights on the fixtures, no directional key light, uniform clinical ambient light with no cast shadows. Style: monochromatic sickly yellow-beige color grade covering every surface including his skin and clothing, almost no color separation; wide-angle lens with mild barrel distortion, soft hazy edge falloff, subtle VHS grain like analog found-footage. Mood: quietly dreadful, dreamlike unease, isolation inside a vast repeating space.

Change the Scene, Not the Style

This is where the master prompt pays off. I can completely change what is happening without explaining the style again.

Make me cook in the kitchen with the same aesthetic.
The character stirring a pot in an endless yellow kitchen with cabinets repeating into the distance
The character cracking an egg into a pan while looking toward an empty doorway in a repeating kitchen
Two of the eight kitchen results. Nano Banana Pro. The least realistic part is me knowing how to cook.
Cinematic film still. Subject: the man from the reference image, wearing his olive jacket, tan shirt, dark jeans and glasses, standing at a plain countertop stirring a pot on an old electric stove, focused on the cooking but glancing up uneasily as if sensing the emptiness around him. Composition: medium-wide shot, deep one-point-perspective liminal-space kitchen with rows of identical cabinets and countertops repeating into the distance, worn linoleum floor, damp drop-ceiling tiles overhead with recessed fluorescent panels, a stack of mismatched old dishware and a discarded microwave piled at the far end of the counter run. Lighting: flat, shadowless fluorescent light from the recessed ceiling panels with blown-out overexposed highlights on the fixtures, no directional key light, giving a clinical ambient glow with no visible shadow beneath him. Style: monochromatic sickly yellow-beige color grade washing over every surface — cabinets, floor, ceiling, skin, and clothing all share the same jaundiced hue with almost no color separation; wide-angle lens with mild barrel distortion and soft edge falloff like a consumer camcorder; subtle VHS grain and haze over the whole frame. Mood: uncanny, dreamlike, quietly dreadful, the unsettling feeling of cooking a meal in a kitchen that should not exist.

Do the Same for Video

Video works the same way. Go back to the agent settings, click Video instructions, paste the same master prompt, and save. Then attach a frame that defines the identity and the pose. I used a photo of myself chopping vegetables in a real kitchen and let the prompt re-grade the room into the Backrooms.
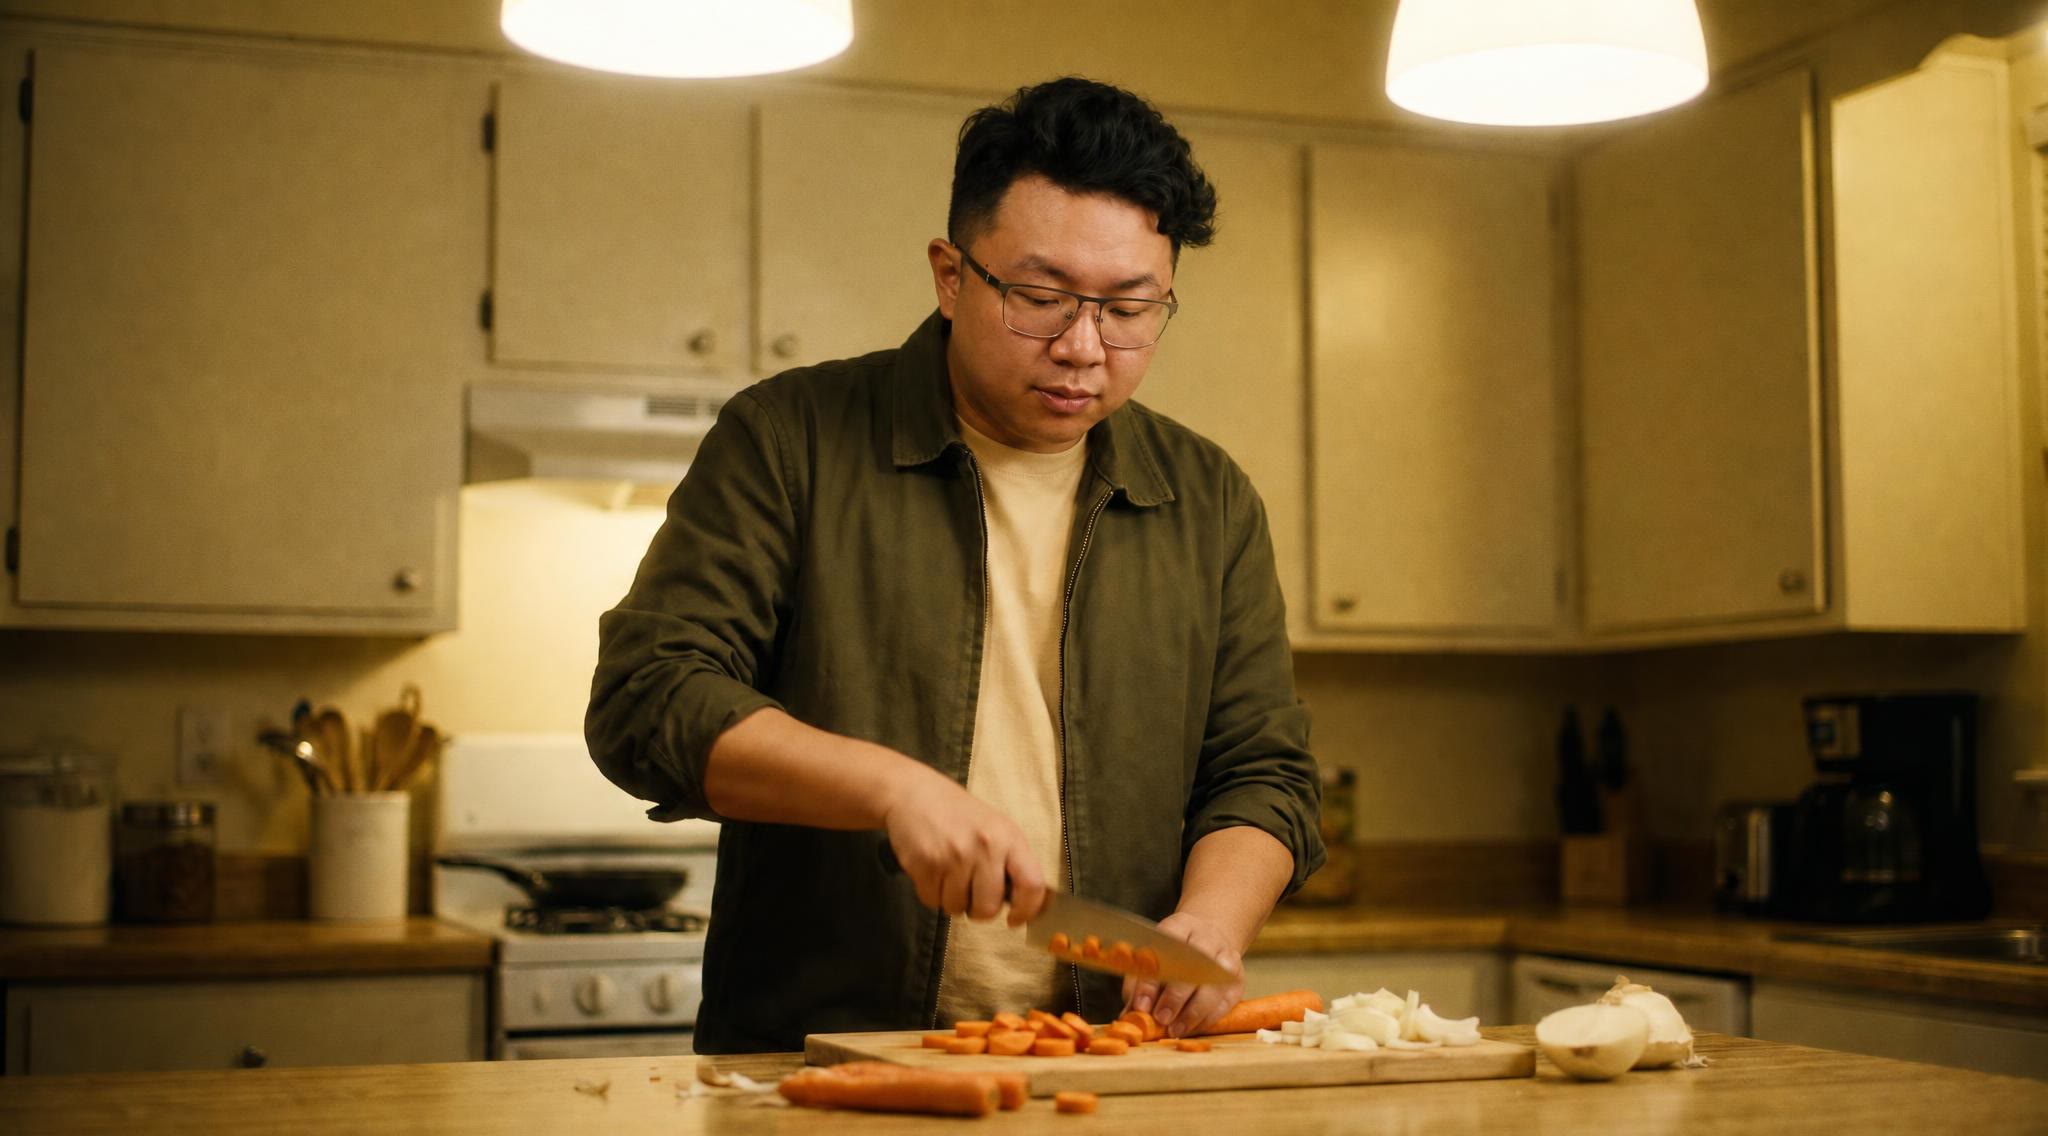
The reference frame for the cooking clips: the character chopping carrots in an ordinary warm-lit kitchen
Make this guy cook in the kitchen with the same aesthetic. Generate a video.

The agent proposed four clips. These are two of them with their exact prompts. Both were generated with Seedance 2.5 in 16:9 at 480p, 8 seconds each.

A locked static medium shot. The kitchen photo controls identity and pose; the master prompt controls everything else.
0:00/0:00
A locked static medium shot. The kitchen photo controls identity and pose; the master prompt controls everything else.
The man from the reference image keeps chopping vegetables on the cutting board in front of him, knife tapping steadily through carrot rounds, eyes flicking up occasionally toward the empty room behind him. Scene: reimagine the kitchen as an endless liminal-space kitchen — identical cabinets and countertops repeating into the distance behind him, worn floor, damp drop-ceiling tiles overhead with recessed fluorescent panels replacing the pendant lights. Lighting: flat, shadowless fluorescent glow from the ceiling panels with blown-out overexposed highlights on the fixtures, no directional key light, uniform clinical ambient light with no cast shadows. Style: monochromatic sickly yellow-beige color grade washing over every surface — cabinets, floor, ceiling, his skin, and clothing all share the same jaundiced hue with almost no color separation; wide-angle lens with mild barrel distortion, soft hazy edge falloff like a consumer camcorder; subtle VHS grain over the whole frame. Camera stays locked in a static medium shot. Mood: quietly dreadful, dreamlike unease, a domestic routine performed inside a vast repeating void.
The same reference and master prompt with one readable action and a slow push-in.
0:00/0:00
The same reference and master prompt with one readable action and a slow push-in.
The man from the reference image sets down his knife, picks up the cutting board, and walks it toward the stove behind him, glancing down the endless row of cabinets as he moves. Scene: reimagine the kitchen as an endless liminal-space kitchen with identical cabinet runs repeating symmetrically into the distance, worn floor, damp drop-ceiling tiles overhead with recessed fluorescent panels. Lighting: flat, shadowless fluorescent glow from the ceiling panels with blown-out overexposed highlights on the fixtures, no directional key light, clinical ambient light with no cast shadows. Style: monochromatic sickly yellow-beige color grade over every surface including his skin and clothing, almost no color separation; wide-angle lens with mild barrel distortion, soft hazy edge falloff, subtle VHS grain like analog found-footage. Camera slowly pushes in as he walks deeper into the repeating kitchen. Mood: uncanny, dreamlike, the unsettling feeling of cooking a meal in a kitchen that should not exist.

These prompts work because each clip gets one clear physical sequence. The environment is impossible, but the action stays simple and observable.

Now I can build an entire sequence shot by shot while keeping the same visual style throughout the film. The next scene was two messages: the request, then a note about the cut I wanted.

Use the same aesthetic. Make this guy go to bed.
I want to break down the shots, snappy cuts. Just generate the video and give me a 5-second clip of him going to bed, cinematic, also this yellowish aesthetic.
A 5-second clip with one hard cut. Seedance 2.5, 16:9, 480p, with the element sheet as the reference.
0:00/0:00
A 5-second clip with one hard cut. Seedance 2.5, 16:9, 480p, with the element sheet as the reference.
The man from the reference image, wearing his tan shirt and dark jeans, sits on the edge of a plain bed and pulls back a worn blanket, glancing warily down the room. Hard cut to him lying down under the blanket, head turned toward camera, eyes open and uneasy, staring into the vast empty room instead of sleeping. Scene: liminal-space bedroom, a single bed and nightstand dwarfed by rows of identical empty room dividers repeating into the distance, worn carpet, damp drop-ceiling tiles overhead with recessed fluorescent panels. Lighting: flat, shadowless fluorescent glow from the ceiling panels with blown-out overexposed highlights on the fixtures, no directional key light, clinical ambient light with no cast shadows in either shot. Style: monochromatic sickly yellow-beige color grade over every surface — walls, ceiling, bedding, skin, and clothing all share the same jaundiced hue with almost no color separation; wide-angle lens with mild barrel distortion, soft hazy edge falloff like a consumer camcorder; subtle VHS grain over the whole frame. Cuts only at the specified point, the camera does not cut on its own otherwise. Mood: quietly dreadful, dreamlike unease, trying to sleep in a room that should not exist.

The explicit hard cut separates two clear beats: preparing to sleep, then realizing sleep is impossible. The instruction to avoid additional cuts stops the model from inventing coverage that weakens the moment.

3. Draw What You Cannot Describe

Sometimes I know exactly what I want but have no idea how to explain it in words. I end up writing a massive prompt about where the arms go, where the camera sits, and which direction the character faces, and the model still interprets it differently. When that happens, draw it. Watch this section at 7:09.

Turn a Sketch Into a Finished Frame

Nothing fancy. A stick figure in Photoshop with one leg forward, one leg back, and the arms roughly where I wanted them. Drop the sketch into the agent, attach the element sheet, and ask for the pose.

Stick-figure sketch of a lunging pose with one arm raised
The character in a dynamic lunge matching the sketch, on a light gray studio background
The sketch and the result. Nano Banana Pro, with the element sheet and the sketch as the two references.
So this is my reference image, and over here, this is a sketch that I made. Can you make me do a pose like that? Generate an image.

This is the image prompt the agent wrote. It reads the sketch for you and turns the stick figure into limb positions, which is the part that is so hard to describe from scratch.

Use the man from reference image 1. Place him in a plain light grey studio, standing and posing like the stick-figure sketch in reference image 2: leaning forward on one bent leg, one arm raised and bent up near shoulder height, the other arm extended down and back for balance, in a mid-stride dynamic lunge. Same outfit, glasses, and hairstyle as the reference sheet. Even soft studio lighting from the front-left, gentle shadow beneath him grounding his feet on the light grey floor, seamless light grey backdrop matching the floor.

When you submit the request, give each reference one job:

  • The element sheet controls identity, wardrobe, and proportions.
  • The sketch controls pose and composition.
  • The master style prompt, if you have one saved, controls color, lighting, texture, lens, and mood.

This division of responsibility is more reliable than asking one reference to control everything. Once it works, each new pose is one line and one sketch. These three were "Do this," "Do this pose too," and "Can you make me a pose like this on a light gray studio background?"

Stick-figure sketch giving a thumbs up
The character giving a thumbs up in the studio
Stick-figure sketch with both arms curved overhead in a heart shape
The character making a heart shape with both arms overhead
Stick-figure sketch balancing on one leg with the other kicked back
The character balancing on one leg with the other kicked back and an arm extended
Three more sketch-to-pose pairs from the same session. Sketch on the left, result on the right.

Use Shapes to Guide Motion

The same idea works for movement. I drew three circles, animated them drifting upward, and uploaded that clip as a reference. The model turned the shapes into actual bubbles following the same beats, which would be nearly impossible to describe with text alone.

The guide: three circles on black, six seconds, uploaded as a reference video.
0:00/0:00
The guide: three circles on black, six seconds, uploaded as a reference video.
Use this video as a guide. Make three bubbles in a garden, realistic. Follow the movement and beats from the video.
The result. Seedance 2.5, 16:9, 480p, 8 seconds, with the circle animation as the only reference.
0:00/0:00
The result. Seedance 2.5, 16:9, 480p, 8 seconds, with the circle animation as the only reference.
Scene: a sunlit backyard garden, soft morning light, green foliage and flowers softly out of focus in the background, shallow depth of field, macro-realistic photography style. Subjects: three realistic soap bubbles, thin iridescent film catching the light, matched in position and relative scale to the reference video — a large bubble lower-left, a small bubble lower-center, and a medium bubble on the right. Motion: each bubble drifts slowly upward and sideways on its own gentle path, wobbling and rotating slightly as it catches the breeze; the large bubble rises first, the small one follows a beat later, then the medium one — same staggered order and spacing as the circles in the reference video. Camera is locked static, matching the reference video's static framing. Style: photoreal, soft natural light reflections and rainbow sheen on each bubble's surface, gentle depth of field blur on the garden background. Lands on all three bubbles floating clear of the ground, still catching light.

Go Further With Paths and Previs

The same trick scales up. For a specific FPV drone shot, draw the flight path directly onto the frame instead of writing a paragraph about the route. If you know Blender or 3ds Max, a rough 3D previs works as a reference video that guides the camera, the action, and the story beats. See both examples at 8:25.

A Reliable Prompt Structure for Every Shot

For each new generation, keep the prompt in the same order:

  1. Subject: Who is in the frame, what they are wearing, and what they do.
  2. Scene: The specific version of the environment.
  3. Composition or camera: Shot size, angle, lens, and movement.
  4. Lighting: The rules from the master style.
  5. Style: Color grade, texture, haze, distortion, and film treatment.
  6. Mood: The emotion the shot should create.
  7. Constraints: Anything that must not change, including cuts, identity, wardrobe, or props.

Repeating this hierarchy makes prompts easier to debug. If a result fails, you can usually identify whether the problem belongs to the subject, scene, camera, style, or motion instead of rewriting everything.

Final Checklist

Before you spend credits on a scene, confirm that:

  • The shots exist as a storyboard, and every panel reads clearly.
  • The characters and locations exist as reference sheets or plates.
  • The master style prompt is saved in the agent's image and video instructions.
  • Anything hard to describe has a sketch, a shape guide, or a previs behind it.
  • Every clip has one readable action and no unnecessary camera cuts.
  • The video prompt only describes what changes, not the whole world again.

That is the main idea behind all of these workflows. I am giving the model fewer things to guess: a storyboard, a locked style, a specific action, and much clearer direction. The less the model has to interpret on its own, the more likely the result matches what I had in mind, and the fewer retries it takes to get there.

If you want to see the same techniques carry a full short film, read how I made The Odyssey with Seedance 2.5.

Ready to take control of your AI videos?

Open Yapper Assistant, save your master prompt in the agent settings, and storyboard your first scene with Seedance 2.5.